Hooray for Anna's "Spice Up Your Kitchen" event over at
Noodlehead! I'm so glad that Anna invited me to participate, because my kitchen definitely needed some spicing up and this was just the motivation I needed!
I have a husband and a two-year-old daughter, and we all love to eat! So as you can imagine, we spend a good amount of time in the kitchen. With all that activity, it drives me NUTS when our kitchen towel ends up on the floor. With a two-year-old this happens a lot!
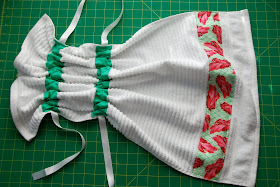
I'm excited to share my solution with you . . . the Stay-put Kitchen Towel. It's easy to make
and you can showcase your favorite fabric on a previously boring kitchen item. Perfect!
(Scroll to bottom of post for a printable version of this tutorial.)
Materials:
- one kitchen towel, and be sure to prewash if it's new!
- three strips of fabric (see cutting details below)
- 2 yards coordinating ribbon for ties
- coordinating thread
- measuring tape
- rotary cutter, self-healing mat, and ruler
- sewing machine (and I recommend using a walking foot if you have one)
Step 1: Cutting
Cut three strips of fabric as shown in picture below:
Step 2: Fold under raw edges of strips
With right side of fabric strip facing down on your ironing board, fold over 1/4" on each short side toward the wrong side of fabric and press.
Repeat for all three strips of fabric.
Step 3: Determine spacing and place strips on towel
Using your measuring tape, measure around your oven door handle and determine where you'd like your ribbon ties to fall. (For my handle, I'll sew the ribbon ties 6" apart.)
Place strips on towel, spacing your top two strips based on your measurement from the last step. I measured from center of strip to center of strip, since the ribbon ties will be inserted behind the center of each strip.
Pin strips in place to prepare for sewing.
Step 4: Sew strips onto the towel
Stitching close to the edge, sew strips onto the towel
IMPORTANT: For the top two strips, sew only the top and bottom (long sides) to the towel, leaving both short sides open. This creates a tube where we'll insert the ribbon in Step 5.
For the bottom decorative strip, stitch along all four sides.
Step 5: Feed ribbon through the tube
The easiest way to do this is with a Clover Easy Turn Tool (shown below - I got mine in the sewing section of our local craft store.) If you don't have one, attach a safety pin to the end of your ribbon and "inchworm" it through your top tube.
Step 6: Measure and sew the ribbon tie
Step 7: Create the gather
Hold the loose end of your ribbon taut while you gather your towel to the desired width. Just go with whatever looks good to you.
Pin loose end of ribbon in place, and cut your ribbon to the same length as the other side.
Stitch along the edge of the fabric tube, securing it to the towel and sandwiching the ribbon in between (just like the other side.)
Step 8: Finish the towel
Repeat steps 5 through 7 for the second strip, and you're done!
Go ahead and tie it onto your oven door handle. Nice job!
(Added 6/6/10):
Treat your ribbon ends to prevent fraying
Touch each raw edge of cut ribbon to an open flame (a lighter or candle will do.) You'll notice that the end of your ribbon will melt slightly, "curing" the ribbon and preventing fraying in the wash. Easy!
Items made from this tutorial are for personal use only, please.
Happy sewing!
Mary


